
Discover the Secret to Re-Streaming a Facebook Live to Multiple Platforms, Adding Guest Speakers & Sharing Your Screen without it costing you a fortune!
Discover the Secret to Re-streaming Facebook Lives to Multiple Platforms, Adding Guest Speakers & Sharing Your Screen without it costing you a fortune!
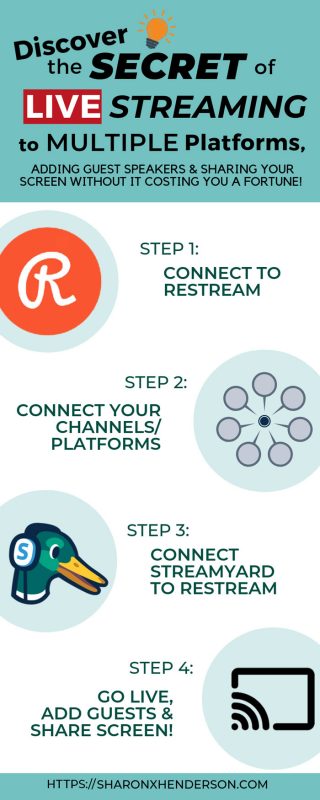
In this tutorial, I will show you the most cost-effective way you can run a Facebook Live while re-streaming to multiple platforms, add guest speakers and share your screen. Yes, that’s right, you can do all three things at the same time without it costing you a fortune! I have researched many different options for achieving these objectives. But I was unable to find anything that ticked all the boxes.
OBS For Facebook Lives
I did try OBS, which stands for Open Broadcasting Software. OBS is an open source interface for live streaming, including Facebook Lives. The great thing about OBS, is that it’s completely free to use. This is always a big plus. Whenever you’re doing anything online you find that you’re paying a little bit here, and a bit more there. Until the monthly payments amount to a considerable outlay when you add them all together. So, the more things you can find that are open source, the better.
The Downside with OBS
The biggest downside to OBS is that it’s quite complicated to configure. That’s for sure. I had to tune in to several YouTube videos just to get it figured out!
Watch the Video:
The Upside with OBS for Facebook Lives
In addition to being open source, you can connect OBS up with the Facebook live scheduler. This is a big plus. That’s because using the native Facebook scheduler finds favour with Facebook. Meaning you’re likely to be rewarded with a greater audience reach for your live. The other plus with OBS, is that you can also share your screen. Indeed, you can set up a whole stack of slides in advance, and navigate between them while you’re live. This is certainly very helpful.
The Biggest Issue with OBS
The biggest problem with OBS for me, was that I wanted to run live website audits. This meant that I needed the website owner to join me on the live. At the same time, I wanted to be able to display visuals. Unfortunately, it just wasn’t possible to do all of these things through OBS. I researched a variety of possible solutions. But, ultimately, I concluded that it wasn’t possible to achieve what was required using OBS. So I needed to look for another option.
Premium Alternatives
I looked at Zoom, because I like zoom very much. Indeed, I use it all the time for meetings with people. But, you need a multitude of add-ons to live stream, share your screen and add guests. Those extras amounted to a lot of money overall – around USD$100 a month. Personally, I think, that this is getting pretty expensive. Particularly given that I didn’t have guest speakers every week that I ran my lives. Oftentimes, I will fly solo. In addition to Zoom, I explored BeLive. Again, though, this was expensive when you included all the premium features I needed in a plan.
AppSumo
I researched lots of different options and then something came up on AppSumo. I, personally, love AppSumo – they advertise some really great softwares and apps, often with one-time only rates that you never see again. It was here that I came across Restream.io. Restream enables you to stream to multiple channels – and indeed platforms – all at the same time. I went ahead and purchased lifetime access to Restream.io for a one-off payment of $49. I would happily share the link with you but the offer was sold out in record time. So, Restream.io is now available through a monthly plan only, but I still highly recommend it.
Restream.io: The Tour
In the screenshot below, you can see the live stream window. This tells me how long I’ve been streaming. You can also see that there are two different ways to connect.
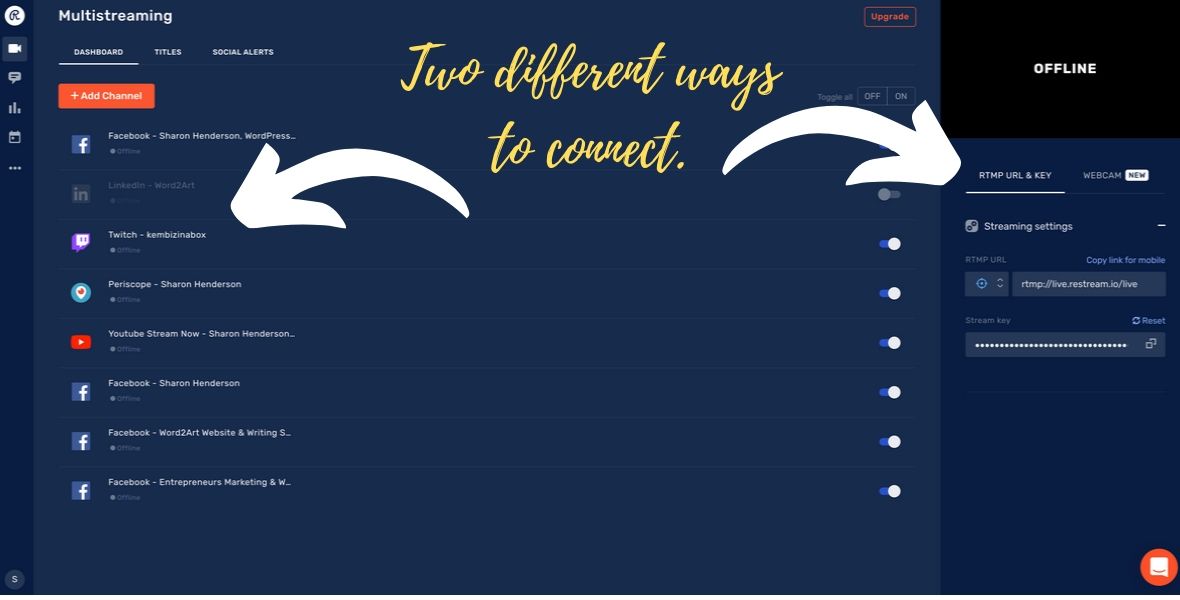
RTMP
You can use an RTMP, which stands for Real Time Messaging Protocol. For this, you need to enter a URL and key. RTMP is useful if you want to use an interface like OBS to stream your live through. In the screenshot, you can see that I’m currently connected to my Facebook page (formerly KEM Biz in a Box, but is now “Sharon Henderson WordPress and Content Strategist.”) LinkedIn is in beta mode and they’re gradually rolling this out worldwide. There’s also Twitch, Periscope (for mobile), YouTube, and my Facebook personal profile. This is where I get the most viewers, particularly in relation to the re-plays. You can also see that Restream is connected to my Facebook group. Those are my current connections, but there are a multitude of others available too. So, there really are a lot of options to choose from. And it’s very simple to connect up a channel or platform. You simply click a few buttons, authorise the app and you’re away.
Pricing Plans
Let’s take a look at Restream.io’s pricing plans. Although I should mention here that I have no affiliate interests in Restream.io! So, there is a free plan. This enables you to stream to 30+ platforms, including your Facebook profile.. The standard plan gives you everything in the free plan plus an extra destination, so you can have a custom RTMP or more than one channel on the same platform from our list of 30+ supported platforms. By way of example, you could have two different Twitch accounts, or two YouTube channels. That’s what I particularly like – the fact that you can have two different Facebook pages plus a group. As you can see, there are lots of other options there. And if you want to connect to a channel that’s not already configured, you can simply set it up manually, using the custom RTMP feature. Restream also have a professional plan, which gives you a few extra things.
The Downside – Branded Links
One thing I do find annoying, is the fact that Restream add their “streaming with restream.io” link on the video replays. You’ve probably noticed by now that at the beginning of each live, I have to go in and manually remove this link from every Facebook channel I’m streaming to. The reason I have to do this, is because as soon as the live comes to an end, that link is picked up by the Facebook algorithm. Adding links that take people away from the Facebook platform is a big no-no. Facebook will penalise you by limiting your audience reach on your re-plays. Since most of my engagement happens post-live, I really have no option but to manually remove the link while I’m live. This is incredibly frustrating. But I don’t see why I should have to pay an additional USD$41 each month just to prevent this link being added to all my live streams. It’s a principle thing really! It’s fair enough that the link is added to all replays on the Personal Forever Free plan. But once you’re paying, you shouldn’t have that link on your lives, particularly when Facebook penalises you for it.
The Downsides – Technical Issues
On occasions, I’ve experienced technical issues with my restreams of Facebook Lives, mostly due to Retream connectivity problems. This can be extremely frustrating – particularly when you don’t discover the issue until you’re actually live. On one occasion, I was running a live, only to discover that it was streaming solely to my Facebook page. Nowhere else. Another downside is that accessing all the comments from a variety of sources can be a little hit and miss at times. One thing to note, is that it’s not possible to view comments originating from groups via Restream. To be fair, this isn’t actually Restream’s fault. It has something to do with the way that Facebook have set things up at their end.
Additional Restream Features
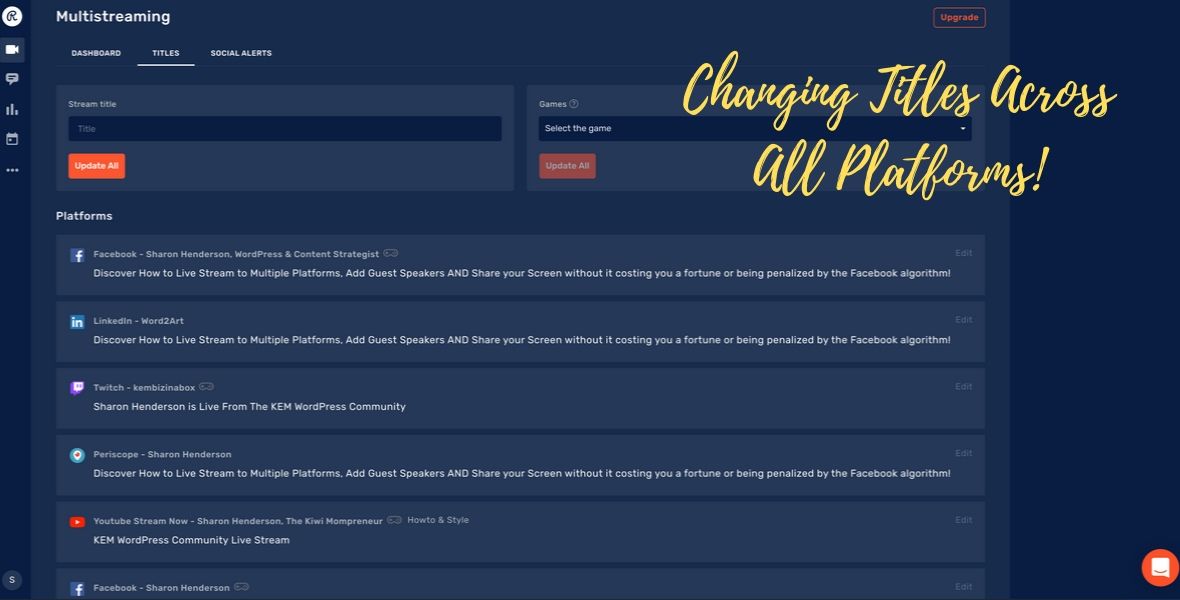
Title Changes
During the Restream demonstration in this particular Facebook live restream, I actually discovered a few features I wasn’t previously aware of. You actually have the ability to change the title of the live across all channels you’re streaming to – during the live itself! You can see how in the screenshot below.
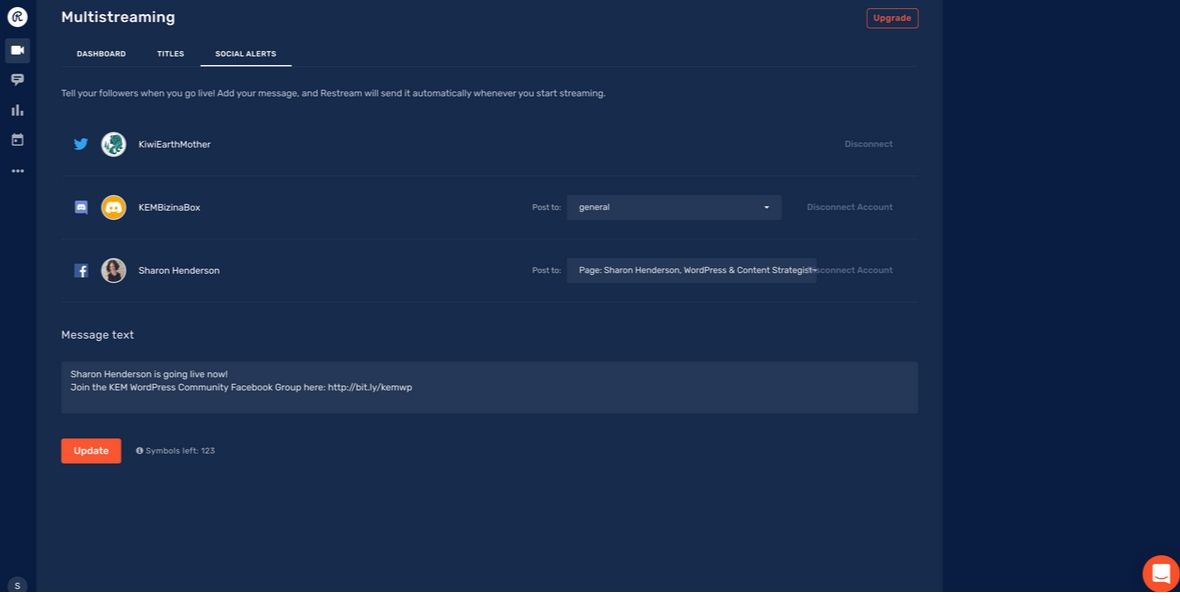
Social Alerts Feature
The social alerts feature enables you to send out a message to all your followers, irrespective of where they are viewing your live. Restream automatically sends out your message as soon as you start streaming – which is awesome! Again, you can see how this works in the screenshot below.
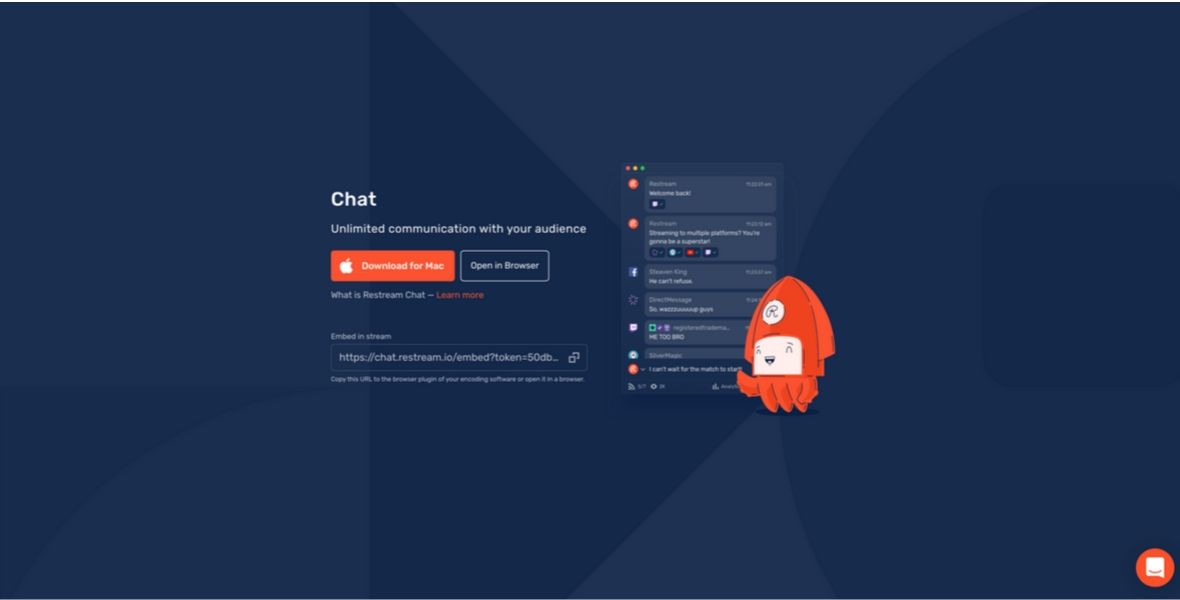
Chat Feature
I have the option either to download the chat feature directly to my Mac, or to open it in the browser.
It’s possible to type a message and display it in the messages box for every single channel you’re streaming to. In the video, I demonstrate this by typing “hello everyone”, and you can see it magically appear in the chat box, when I send the message. Which means it’s visible to everyone across all channels. Again, this is a pretty cool feature and you can see how it looks in the screenshot below.
So we’ve now talked about the first component of the Facebook Live re-streaming setup, which is Restream. But that’s only part of the puzzle. The second part of the puzzle is Streamyard, which is the streaming interface I have settled on as the best option.
StreamYard: The Tour
At the same time that I was researching the best tools to achieve my live stream objectives, so was a colleague, Andy Griffiths. Andy did a guest appearance on one of my lives, back in the early days. We were both brainstorming, and trying to figure out what was the best option out there. Andy was the guy that put me onto StreamYard. So, while Restream essentially enables you to stream on multiple channels, StreamYard is the interface or dashboard that enables you to share your screen and add guest speakers.
Below is a screenshot where I am added to the live stream.
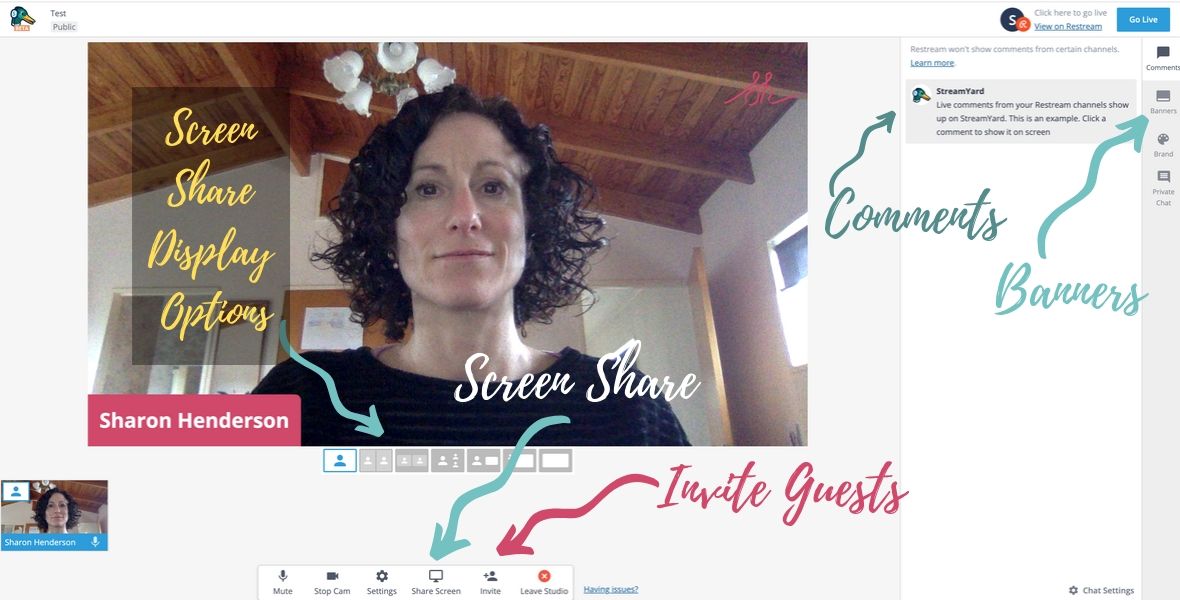
You can see the main panel, plus the option to add guest speakers. As you can see, guest speakers can be displayed in a variety of configurations. I believe that you can add as many as 10 people at any one time! That said, I think it would look really funky to have that many people displayed at once! There is also the option to have a share screen only option, with the speakers hidden from view. At the bottom of the screenshot, you can see the option to invite people. Clicking on that button results in a popup with a shareable link. The guest can then simply click on the link and they are automatically connected to the live, and can see the StreamYard interface. There are also various settings, like mute and the ability to add or remove people from the stream. It really is a clean and simple interface to use. Contrast this with other interfaces like OBS, and you can see how StreamYard really comes into its own. When you’re live you honestly want things to be as easy as possible to use, that’s for sure!
Comments
In the live, viewers could see all the comments in real time. During a live, they are displayed under “Comments” (funnily enough!) on the right-hand side. If I click on them, I can add them to the live feed, so that all the viewers can see them at the bottom of the live screen.
Banner Options
Then we have the banner options, again on the right-hand side, beneath the “Comments” tab. I can set up banners ahead of time here, and even organise them in folders. I can affix my logo, and add pretty backgrounds behind the host, speakers and any screen that’s being shared. During the live, I demonstrated how to add one of the banners to the live feed. In this case, I was sharing my affiliate link for StreamYard. I had created a link shortener using LinkWizard. So, the affiliate link displayed is just http://inkw.co/streamyard. That takes you to a link where you can purchase StreamYard if you so wish. I do highly recommend this interface. It really is very good.
Private Chats
The last tab on the right-hand side is “Private Chat”. As the name would suggest, you can engage in private chats with your guest speakers using this feature.
Branding
Above the “Private Chat’ tab, is the “brand” tab. There’s an option to add overlays and backgrounds if you wish to do so. You also have the option to display your name, or remove it. StreamYard are frequently adding new features, which is quite cool.
Pricing
The pricing page on StreamYard’s website enables you to switch between monthly and annual plans. There is a free plan. Impressively, broadcasts are not limited currently, although limits may be introduced at a future date. With the most popular paid plan, there’s no StreamYard branding attached. With my plan, you have the option to add your own custom logo that I’ve shown you, custom overlays if you want, as well as custom backgrounds. The reason that I upgraded to the most popular plan, at $25 a month, is so that I could connect StreamYard up with Restream. And it really is a one-click connection. It’s really really simple to do and the two apps work together beautifully. I do like StreamYard a lot. It hasn’t let me down when restreaming Facebook Lives and the support is excellent.
Restreaming Facebook Lives: Summing Up
There have been a few niggles, including some technical challenges, comments not always displaying in the comment box, and re-streaming not occurring during some re-streamed Facebook Lives. My biggest complaint relates to the “restream.io” branding on paid plans. Those things aside, overall I have been very happy with the StreamYard-Restream setup for my lives and would highly recommend it as a solution that ticks all the boxes. Let me know your thoughts in the comments – have you come up with a better solution for restreaming a Facebook Live at a better price? If so, I’d love to hear from you!
DISCLOSURE: This post may contain affiliate links, meaning I get a commission if you decide to make a purcase through my links, at no cost to you. Please read my Disclosure Policy for more info.